How to add products to OpenCart
 Lisa, 26th October 2012
Lisa, 26th October 2012
The products section of OpenCart is extremely comprehensive. Therefore there will be LOTS of options you don't need to worry about but here's a run down of what everything means.
Step 1:
From the menu in admin along the top of the screen, select Catalog > Products.
You'll see the following screen listing all of the products currently in the system. You can use the top row - with a light blue background - to filter the products you see in this list. Simply type in a products name or model and click the blue "Filter" button.
To edit any existing product, click [Edit] on the right hand side of that product. To delete any product, tick the box to the left of it's name and then click the blue "Delete" button on the top right. Be carefulnot to select any other boxes that you don't want to delete!
To add a new product click the blue "Insert" button to the top right of the screen.

Step 2:
If you click "Insert" to add a product you'll see the following screen. If you were to click [Edit] next to an existing product you'd see the same screen but with the sections already filled in.
The first tab that the page opens on is "General". If you've got a multilingual site these boxes will be repeated for each language but in this example we're looking at an English-only site.
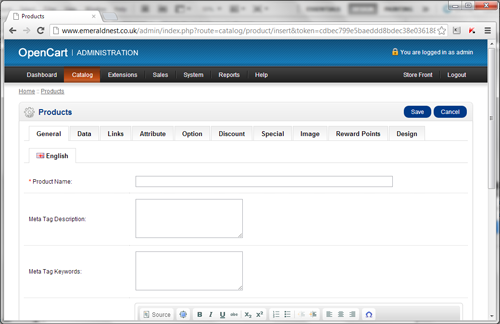
Each field on the form:
Product name: This is where you add the name of your product, as you'd like it to appear on the site.
Meta Tag Description: Here, add a sentence or two about that product This is the page's description for search engines and can sometimes be displayed in search results.
Meta Tag Keywords: Again, for search engines, but not really commonly used anymore. Still worth adding in though. So just write a list of words about that produc - 10 words comma seperated with no spaces between them will be fine.
Description: Here you need to write as much as you can about the product you're selling. The more text here, the more informative your site is for your customers (but don't lose them in waffle!) and the more unique text you'll have on your website for search engines.
Product Tags: Here you can write words, comma seperated with no spaces, which describe your product. Tags are a bit like another way of categorising your product - so you might have tags such as "yellow,t-shirts,girls,my little pony".
Once you've filled in this page, you can click the blue "Save" button at the top right, or you can click on the "Data" tab. It's a good idea to "Save" often incase your session times out whilst you answer the phone or make a cup of tea! But it will mean you are taken back to the list of products and will need to click [Edit] to come back to carry on.
Step 3:
Next you've got the Data tab.
Each field on the form:
Model: This is a required field (marked with a red asterix) but if you don't have a model number/reference for the type of product you're adding, just repeat the title.
SKU: Stock Keeping Unit - only needed if you're working within a larger stock keeping system and your products have SKU codes.
UPC / EAN / JAN / ISBN / MPN: Again, these are only needed if your products/business use these codes. If you don't know what they are, then it means you don't use them so you don't need to worry about them!
Location: You can add in a location for where the item is stocked if you wish to - this might be useful for larger shops with warehouses spread around the country and so who need to know where items need to be dispatched from.
Price: The all important price of your item! Don't add a currency sign so £5 would be 5.00.
Tax class: If you're VAT registered as part of your site set up your developer may have sorted out tax classes for you so you need to select the appropriate one here. If you're not tax registered then you don't need to select one. You can have various tax classes as there are different amounts of tax on different types of items.
Quantity: How many have you got in stock?
Minimum Order: Is there a certain amount of this product that people have to buy? I've had a client say that an iced cake is £xx but you need to order at least 4 of them.
Out of stock status: What would you like the website to say when an item is out of stock? This will depend on whether you're allowing pre-orders or if you know how quickly you can get stock back in.
Requires shipping: Does this item need to be delivered? Or is it an electronic download?
SEO Keyword: In here, if your site is set up to have search engine friendly URLs, add in a word which will be in the URL for the page. Eg. if you're adding a product called "My Little Pony T-Shirt" write "my-little-pony-tshirt" in this box and the URL for that category page will be: http://www.yourshop.co.uk/my-little-pony-tshirt . No two pages online can have the same URL though, so once you've used a SEO keyword for a product, you can't use it for another product or for an information page or anything else. Also, if you have more than 1 word in this box, try to be consistent with how you write them - never leave spaces so either always put a hyphen between words - eg. my-little-pony - or perhaps an underscore - my_little_pony. The consistency is just so that your site URLs stay looking neat and you don't have some pages of http://www.yourshop.co.uk/my-little-pony and some of http://www.yourshop.co.uk/postman_pat.
Image: Here you can upload the main product image for your product. You need to make sure the images you upload are at least as big as the "Product Image Popup Size:" which is set under System > Settings > Image [tab]. If they're smaller, the image will be stretched and fuzzy when it's shown at it's largest size and if it's bigger then it'll take an unnecessarily long time to open. jpgs are best for photos and if you've got any kind of "save for web" feature in your imaging software (PhotoShop does) then use that as it'll keep the file sizes nice and small.
Date available: If you're adding something which isn't available yet but you want to promote it or you just know you won't have time to write about it when it is available, then you can set a date here for when the item should appear on the site.
Dimensions (L x W x H): You can add in the dimensions of a product if it's useful for a customer - eg. telling them how big a cupboard is so they can measure if it's the right size for them. Just put numbers in these boxes.
Length class: Here you can explain what type of measurement the figures you typed into the box above relate to.
Weight: This one is necessary if you're organising your delivery/shipping by the weight of an item.
Weight class: As with size, this states what unit of measurement you're refering to within the Weight field.
Status: Whether this product is live on the site yet or not.
Sort Order: Just a number which dictates what order the product should appear in on the site. 0 means first and the highest number would be last. A tip here is to number your sort order in 10s - eg. 10, 20, 30, 40. This means that if you change your mind and want a product inbetween 2 and 3, you can just number it 25 rather than have to edit all the products and shuffle them all back up 1!
Once you've filled in this page, you can click the blue "Save" button at the top right, or you can click on the "Links" tab.
Step 4:
Next you've got the Links tab.
Each field on the form:
Manufacturer: Type the names of the manufacturers you want to add this product to - the field will auto-fill. In older versions of OpenCart you had to select the brand / manufacturer from a list. (If your brand isn't in the system yet, you can add it under Catalog > Manufacturers).
Categories: Type the names of the categories you want to add this to - the field will auto-fill. (In older versions of OpenCart this was a set of tick boxes.)
Stores: This is to do with when you are running more than 1 shop at a time form the same installation of OpenCart. Most often, you don't need to worry about this box and just leave "Default" ticked. If you have more than 1 shop, tick all the shops this product is for.
Downloads: Only worry about this if you're selling downloadable products straight from the website. Or if you've got downloadable User Manuals for items. You can upload these items under Catalog > Downloads and then select them from this list.
Related Products: Start typing the name of a related product you've already got in the system and it will appear here for you to click on / select. This is so that under a product it might say "if you like this, you might also like this:".
Once you've filled in this page, you can click the blue "Save" button at the top right, or you can click on the "Attribute" tab.
Step 5:
Next you've got the Attribute tab.
Attributes are to be used when there are factors of a product that you may wish to compare to another product - they allow the "compare" feature of OpenCart to work.
So under Catalog > Attributes > Attributes Groups you can create groups of attributes and then under Catalog > Attributes you can create attributes (we'll cover this in another article).
Once you've got your Attributes saved, on this tab, you just need to start typing the name of an attribute until it shows up and then select it. The in the description box on the right hand side write about that attribute for this product. So you may have an attribute of "Type of artwork" and a description of "Oil paint" and then for another product you may select the same attribute and write a description of "Water colour".
You can continue this process for each item as many times as you'd like using the "Add Attribute" button.
Once you've filled in this page, you can click the blue "Save" button at the top right, or you can click on the "Option" tab.
Step 6:
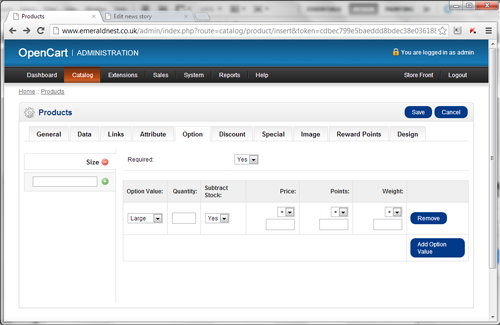
Next you've got the Option tab.
This is to do with when an item comes in multiple colours or sizes. You add your Options under Catalog > Options (guide coming soon). An Option might be "Size" and you then give that Option values of Small, Medium, Large.
When it comes to adding products, you start typing the name of your Option in the box on the leftand select it when it shows up/auto-fills. Then the right hand side of the screen changes to let you choose an option value for "Size" under the list "Option Value".
So you might select Large, and then say how many large you've got in stock (quantity) and if you want the site to subsctract stock of these as they sell. You can also pick if this particular Option Value costs more or less (+ or - £s), whether you reward more or less Reward Points with it and whether it weights more or less.
You can keep adding Option Values using the big blue "Add Option Value" button so you can have Large, Medium and Small all listed here.
Then if you need to add another Option such as colour, you go back to the left hand side of the screen and type another option name into the next box down which has a little green + next to it.
Once you've filled in this page, you can click the blue "Save" button at the top right, or you can click on the "Discount" tab to continue.
Step 7:
Next is the Discount tab, which you really might not need when you're first adding your products.
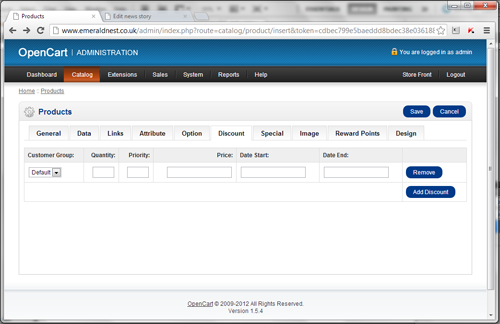
Firstly, you can select a customer group (more on this in a forthcoming article).
Next you can enter a quantity - this refers to how many of something someone has to buy before the discount kicks in. If this isn't relevant just leave it blank. But if your discount is for people who buy more than 3 or something, then enter 3 in this box.
Priority refers to the fact that you can add multiple discounts here. So if you have 3 different discounts on this product, here you can state the order in which they should be applied (which can effect the overall price). 1 means it's applied first, 2 means it's applied 2nd etc.
Price is the new price if this discount is in effect, and the start date and end date state when the discount is valid.
Once you're done, click the blue "Add Discount" button to add a new discount, click "Save" or move to the next tab: Special.
Step 8:
The next tab is the "Special" tab for creating special offers.
As above, select a customer group if appropriate, a priority order in which special offers should be applied, a start date and an end date.
Add as many offers as you like and click "Save" or move to the next tab when you're finished.
Step 9:
The next tab is "Image" which allows you to upload additional images for your product.
The sort order box (which you can see when you click to add an image) states which order these images appear in, with 0 being first and the highest number being last.
As always, click "Save" or move to the next tab!
Step 10:
If you're taking advantage of OpenCart's Rewards Points feature then here you can enter how many points a product is worth, and assign different points values for different customer groups.
If you're not using this feature, just ignore this tab - and if you want it hidden from your website completely point your developer in this direction for our guide on how to remove the Reward Points feature.
Then, you guessed it, click "Save" or move to the next tab!
Step 11:
The last tab is "Design" which deals with the layout of the page - but you probably don't need to touch this one because you might mess up how your site looks!
Make sure you click Save and you're done!
29.02.24
We are delighted to announce that 18a has been recognised for its outstanding work in the "Web Design Agency of the Year - UK" category at… Read →
27.02.24
I recently had an interesting problem to solve. I'd built a brand new author website on a shiny installation of Laravel 10, utilising its out-of-the-box… Read →
15.02.24
WordPress is the incredibly popular blogging-come-full-website platform that powers over 835 million websites* in 2024. It's functionality is extended by plugins, and one such very… Read →


