;transform: ;msFilter:;'%3E%3Cpath d='m20.487 17.14-4.065-3.696a1.001 1.001 0 0 0-1.391.043l-2.393 2.461c-.576-.11-1.734-.471-2.926-1.66-1.192-1.193-1.553-2.354-1.66-2.926l2.459-2.394a1 1 0 0 0 .043-1.391L6.859 3.513a1 1 0 0 0-1.391-.087l-2.17 1.861a1 1 0 0 0-.29.649c-.015.25-.301 6.172 4.291 10.766C11.305 20.707 16.323 21 17.705 21c.202 0 .326-.006.359-.008a.992.992 0 0 0 .648-.291l1.86-2.171a.997.997 0 0 0-.085-1.39z'%3E%3C/path%3E%3C/svg%3E)


A practical, code-driven walkthrough using WooCommerce
Client-side tracking is becoming less reliable every year. Ad blockers, browser privacy features, and tightening cookie rules all reduce the accuracy of traditional pixels.
Server-side tracking using Google Tag Manager (sGTM) and Meta’s Conversions API (CAPI) is currently the most robust way to track high-value events like purchases – but the setup is not straightforward, and the official documentation leaves out many real-world details.
This post walks through how we implemented a production-ready sGTM + Meta CAPI setup for a WooCommerce site, including the architectural decisions, code examples, and the gotchas we ran into along the way.
While the example uses WooCommerce, the overall approach is platform-agnostic.
High-level architecture
Before touching any tools, we agreed on one core principle:
The application should emit business events, not tracking instructions.
That led to this architecture:
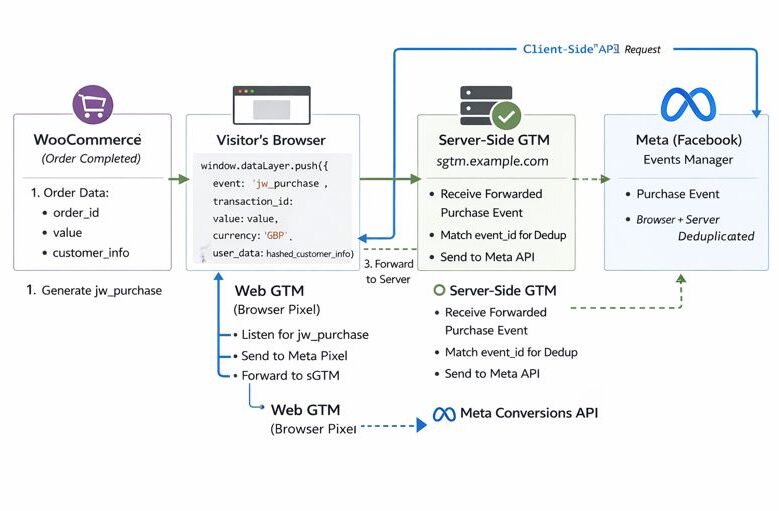
Each layer has a single responsibility:
- WooCommerce: detect real purchases
- dataLayer: neutral event transport
- Web GTM: consent enforcement and forwarding
- sGTM: reliable server-side delivery to vendors
This separation makes the system easier to debug, extend, and reason about.
Emitting purchase events from WooCommerce
We deliberately avoided WooCommerce tracking plugins. Instead, we treated Woo as a source of truth for business events and pushed structured data into the browser dataLayer ourselves.
Why not a plugin?
- Plugins tend to bundle vendor logic, consent, and event detection together
- They’re harder to audit
- They make future platform changes more painful
By pushing clean events into the dataLayer, everything downstream becomes configurable without touching application code again.
Hooking into the Woo checkout flow
To detect a completed purchase, we used the woocommerce_thankyou hook. This fires when an order has been created and the customer is viewing the confirmation page.
A simplified version of the code looks like this:
add_action('woocommerce_thankyou', function ($order_id) {
    if (empty($order_id)) return;

    $order = wc_get_order($order_id);
    if (!$order) return;

    $payload = [
        'event'          => 'purchase',
        'event_id'       => (string) $order_id,
        'transaction_id' => (string) $order_id,
        'value'          => (float) $order->get_total(),
        'currency'       => $order->get_currency(),
        'user_data'      => [
            'em' => hash(
                'sha256',
                strtolower(trim($order->get_billing_email()))
            ),
        ],
    ];

    add_action('wp_footer', function () use ($payload) {
        echo '<script>';
        echo 'window.dataLayer = window.dataLayer || [];';
        echo 'window.dataLayer.push(' . wp_json_encode($payload) . ');';
        echo '</script>';
    });
});
Key design choices
- Order ID as
event_id
This becomes the deduplication key used later by Meta and Google. - Hashing user data in PHP
Raw personal data never enters GTM or browser-visible config. - Footer injection
Keeps tracking scripts grouped and avoids timing issues with GTM.
Avoiding duplicate purchase events
WooCommerce allows the thank-you page to be refreshed, which means the same order can be rendered multiple times.
Rather than trying to suppress this at the application layer, we relied on deduplication downstream using a consistent event_id.
This approach:
- keeps application logic simple
- avoids state storage
- works across browser + server delivery
For subscription sites, you’ll also want to explicitly decide whether renewal orders should fire purchase events. In our case, we limited tracking to first-time purchases only.
Web GTM: consent and event forwarding
The web GTM container acts as the control plane.
Its responsibilities:
- Load only after user consent
- Receive
dataLayerevents - Forward allowed events to the server-side container
Base Google tag
We used a Google tag (not a hardcoded gtag.js) as the base tag:
- Fires on all pages
- Loads only after marketing/analytics consent
- Configured with a Transport URL pointing to the sGTM endpoint (e.g.
https://sgtm.example.com)
This replaces all hardcoded tags in the theme.
Forwarding purchase events
For each business event (e.g. purchase), we created a GA4 Event tag:
- Event name:
purchase - Trigger: custom event
purchase - Event parameters populated from
dataLayer - Uses the same Transport URL
Gotcha: The base Google tag must fire before event tags, or forwarding will silently fail.
Creating the server-side GTM container (billing gotcha)
Creating an sGTM container automatically provisions infrastructure in Google Cloud.
Two important realities:
- A billing account is mandatory
- GTM access alone is not enough
In practice, this means:
- You (or the client) need a Google Cloud billing account
- The project must be linked to it
- You’ll need Editor or Owner access
Common frustration: The billing selector may appear empty until you log out and back in, especially if you’re switching Google accounts.
This step often takes longer than expected.
Using a custom domain for sGTM (strongly recommended)
By default, sGTM runs on a *.run.app domain. This works, but it’s third-party.
We strongly recommend mapping a subdomain, for example:
sgtm.example.comBenefits:
- First-party cookies
- Better reliability
- Fewer blocked requests
Cloud Run domain mapping
Once the service exists, map the domain in Cloud Run. Google will generate a DNS record, typically:
sgtm CNAME ghs.googlehosted.comDNS propagation and SSL issuance can take up to an hour.
Meta Conversions API: permissions surprise
To send events server-side to Meta, you need:
- Pixel ID
- Conversions API access token
Creating the token requires Admin or Developer access on the Meta Business Portfolio.
Pixel-level access alone is not sufficient.
In practice, this often means:
- asking the client to generate the token, or
- requesting temporary Developer access
Server-side GTM: Meta CAPI tag
In the server-side GTM container, we added a Meta Conversions API tag:
- Pixel ID
- Access token
- Action source:
website - Trigger: forwarded
purchaseevent
Critical detail: The event_id sent from the browser must exactly match the server event ID.
When both browser and server events share the same ID, Meta automatically deduplicates them.
Preview mode: the most confusing part
There are two separate preview systems:
- Web GTM preview
- Server-side GTM preview
They are independent.
A very common mistake is seeing requests in the browser network tab but nothing in sGTM preview.
What fixed this for us:
- Opening sGTM preview first
- Triggering events after the preview session is active
- Ensuring requests hit the custom domain, not the default
.run.appURL
Once working, we could see:
- incoming
/g/collectrequests - tags firing
- outbound requests to Meta’s Graph API
Testing safely in production
We avoided fake events and instead tested using:
- 100% discount coupons
- real checkout flow
- Meta test event codes (temporarily)
Reality check: Meta’s Events Manager UI is slow and inconsistent.
We relied on:
- GTM preview
- browser network requests
- Meta API HTTP responses (200 OK)
rather than waiting for immediate UI confirmation.
Final architecture recap
This setup is intentionally modular:
- WooCommerce → business events
- dataLayer → neutral transport
- Web GTM → consent + routing
- sGTM → vendor delivery
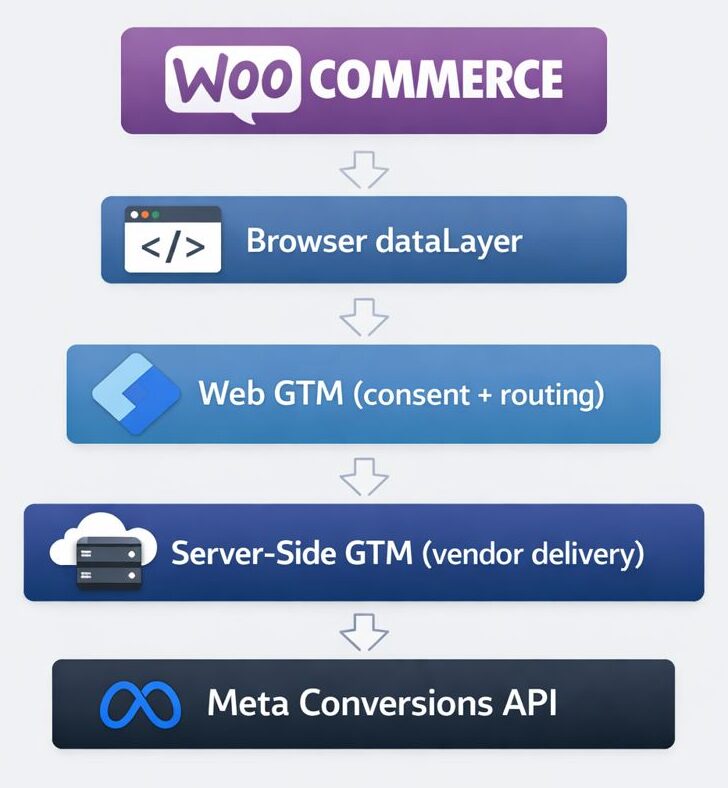
The same pattern can be reused for:
- subscriptions
- renewals
- additional platforms
- other sites (e.g. LMS or membership systems)
This is not a one-off fix – it’s a reusable tracking framework.
Closing thoughts
This setup does come with some upfront complexity, but in practice that effort pays off quickly in:
- cleaner, more reliable data
- fewer surprises when platforms or browsers change behaviour
- easier long-term maintenance and debugging
The key shift in mindset is to treat Google Tag Manager (both web and server-side) as a routing layer, not a dumping ground for third-party scripts. Once you do that, the system becomes much easier to reason about – and much harder to accidentally break.
I won’t pretend this was a simple setup. While the overall concept makes sense at a high level, stitching it together across WooCommerce, GTM, server-side GTM, cloud infrastructure, and vendor platforms is not especially straightforward. There are plenty of small details and gotchas along the way.
That said, once everything is in place, the result is a tracking architecture that feels far more robust, transparent, and future-proof than traditional browser-only implementations. Hopefully this write-up saves someone else a few days of trial and error when tackling the same problem.